Wondering how to paint a ceiling without making a mess or ending up with visible streaks?
While painting a ceiling may seem like a challenging DIY project, following the right preparation and painting techniques can help you achieve a smooth, even finish.
In this guide, you’ll learn how to paint a room ceiling, how to avoid common mistakes like roller marks, how much paint you’ll need, and what to do if you’re dealing with a mouldy ceiling.
How to Paint a Ceiling for Beginner
Painting a ceiling can make a big difference to the look and feel of a room, but it also requires careful preparation and the right technique to get a smooth finish.
Whether you’re refreshing a tired surface or covering stains and imperfections, this guide will walk you through the process step by step.
Tools and Materials You’ll Need
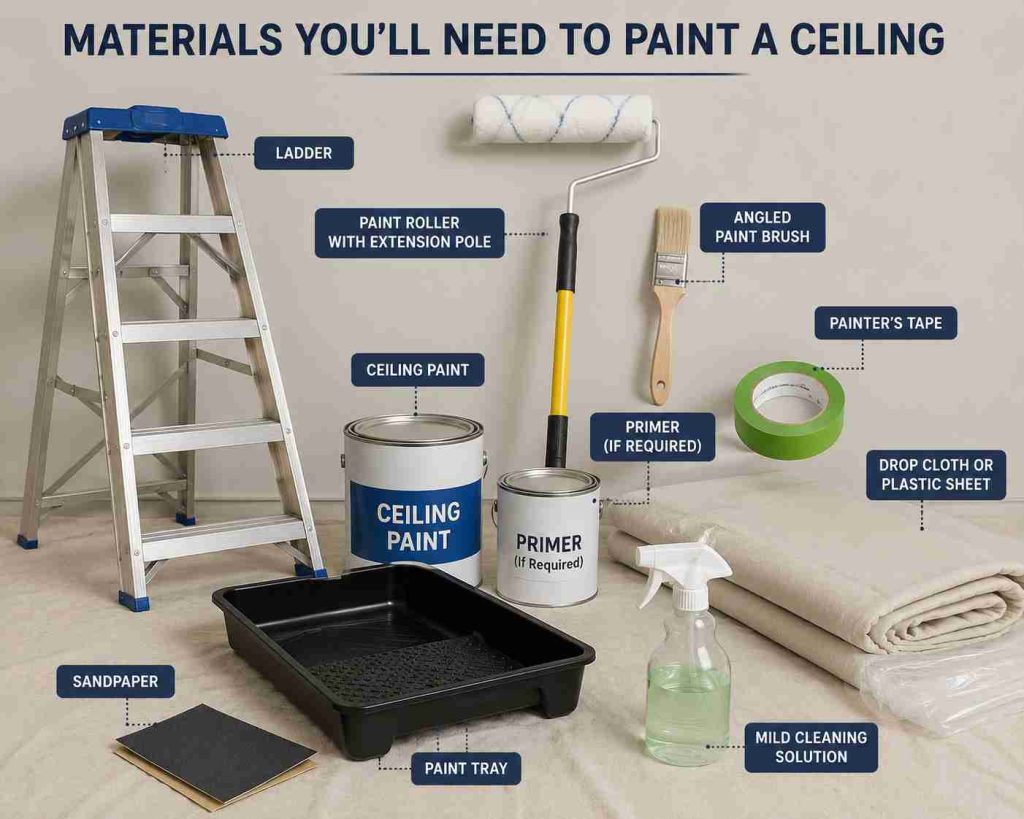
Before you begin, it’s important to gather the right tools and materials.
Having everything ready will make the process smoother, help you avoid unnecessary interruptions, and set you up for a cleaner, more professional finish.
- Ceiling paint
- Paint roller with extension pole
- Angled paint brush
- Paint tray
- Painter’s tape
- Drop cloth or plastic sheet
- Ladder
- Sandpaper
- Mild cleaning solution
- Primer (if required)
Having everything ready beforehand makes the painting process much smoother and helps avoid interruptions.
Step 1: Prepare the Room
Proper preparation is one of the most important parts of painting a ceiling. It not only protects your furniture and flooring but also helps you achieve a cleaner and more professional-looking result.
Move as much furniture out of the room as possible and cover anything remaining with drop cloths or plastic sheets.
Use painter’s tape around light fixtures, ceiling fans, walls, and cornices to protect areas you don’t want to paint.
Step 2: Clean the Ceiling Surface
Painting over dust, grease, or cobwebs can prevent the paint from adhering properly. Dirt trapped beneath fresh paint may also cause peeling or an uneven finish later.
Use a microfiber cloth or vacuum with a brush attachment to remove loose dust. If the ceiling has grease or stains, wipe it gently with a mild cleaning solution and allow it to dry completely before painting.
Step 3: Repair Any Cracks or Holes
Small cracks and nail holes may become even more noticeable after applying fresh paint. Taking the time to repair imperfections will result in a smoother finish.
Fill any cracks or holes using an appropriate filler, then allow it to dry fully. Once dry, lightly sand the repaired areas until they blend evenly with the surrounding ceiling.
Step 4: Apply Primer (If Needed)
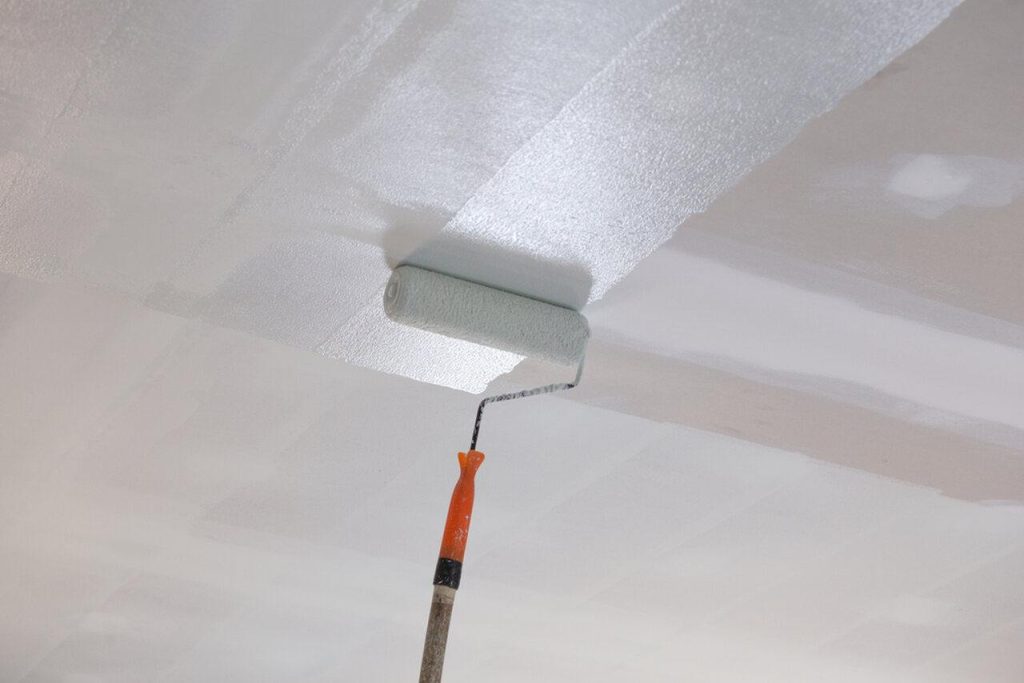
Primer is recommended if you’re painting over dark colours, water stains, repaired areas, or new plaster. It creates an even base and helps the topcoat adhere better.
Apply a thin, even layer of primer across the ceiling and allow it to dry according to the manufacturer’s instructions before applying paint.
Step 5: Cut In Around the Edges

Before using a roller, paint the edges of the ceiling with a brush. This technique, known as “cutting in,” makes it easier to achieve neat lines where the ceiling meets the walls.
Use an angled brush to paint a border approximately 5 to 8 cm wide around the entire ceiling. Try to work in sections so the brushed paint remains wet when you begin rolling.
Step 6: Roll the Ceiling Evenly
Once the edges are complete, use a roller attached to an extension pole to paint the larger areas.
Load the roller evenly with paint and work in small sections using overlapping strokes. Apply consistent pressure throughout each pass and avoid pressing too hard, which can leave uneven texture or visible roller marks.
How to Paint a Ceiling Without Roller Marks
One of the most common questions homeowners ask is how to paint a ceiling without roller marks. Fortunately, a few simple techniques can help create a smooth finish.
Use a quality roller with the correct nap length for your ceiling texture, avoid overloading it with paint, and maintain a “wet edge” by working continuously across each section.
Finish each section with light, straight strokes in the same direction to create a more consistent appearance.
How to Paint a Mouldy Ceiling?
Before painting, it’s important to deal with the mould itself rather than simply covering it with paint.
If mould is painted over without being treated first, the spores can continue to grow beneath the surface, which often causes the stain to come back and may even lead to peeling paint or a musty smell.
Start by cleaning the affected area with a mould remover that is safe for painted surfaces, and always follow the product instructions carefully.
Make sure the room is well ventilated while you work, and allow the area to dry completely before moving on.
If the mould has caused staining or the ceiling has been damaged, you may need to repeat the cleaning process or lightly sand the area once it is dry.
Once the ceiling is fully dry and clean, apply a mould-resistant primer to help seal the surface and reduce the chance of mould returning.
After the primer has dried, finish with mould-resistant ceiling paint for better protection and a longer-lasting result.
How Much Paint Do I Need to Paint a Ceiling?
The amount of paint required depends on the size of your ceiling and the number of coats being applied.
As a general guide:
- A 1-litre tin typically covers around 10–12 square metres.
- Most ceilings require two coats for even coverage.
- Textured ceilings usually need slightly more paint than smooth ceilings.
It’s always a good idea to purchase a little extra paint for touch-ups after the project is complete.
How Long Does It Take to Paint a Ceiling?
Many homeowners also ask how long does it take to paint a ceiling.
For an average bedroom, the painting itself usually takes around 2 to 4 hours, depending on the room size and your level of experience. Including preparation, drying time between coats, and clean-up, the entire project may take most of the day.
FAQ
Can I paint a ceiling without removing furniture?
Yes. However, furniture should be moved to the centre of the room and covered properly to protect it from paint splatters.
Do I always need two coats?
In most cases, yes. Two coats usually provide better colour consistency and coverage than a single coat.
Should I paint the ceiling or walls first?
It’s generally recommended to paint the ceiling first. This prevents ceiling paint from accidentally dripping onto freshly painted walls.
What type of paint is best for ceilings?
Flat or matte ceiling paint is the most common choice because it helps reduce glare and hides minor surface imperfections.
Can I paint over mould without cleaning it?
No. The mould should always be treated and removed before painting to prevent it from returning beneath the new paint.
Also Read: 12 Pre Move In Cleaning Checklist Before Moving Into a New House
Let Sparkling Nest Handle Your Painting Project
Painting a ceiling yourself can be rewarding, but it also requires time, preparation, and the right techniques to achieve a smooth, professional finish.
If done incorrectly, it can lead to streaks, drips, uneven coverage, and damage to surrounding surfaces.
If you’d rather leave the hard work to experienced professionals, Sparkling Nest is here to help.
Our professional painting service in Singapore handles everything from ceiling and wall painting to surface preparation and touch-ups, delivering high-quality results with minimal disruption to your home.
Ready to refresh your space? Contact us today for a free quotation or visit us to learn more about our painting services and discover how Sparkling Nest can transform your home with a flawless new finish.